Monday, March 30, 2015

Sega Naomi Maintenance: GD-Rom Swaps (Error 24) and Arcademodbios

Naomi Error 24/GD-Rom Swaps

So a couple days ago I got a new Naomi game in the mail, popped it in and was greeted with a nice Error 24 (GD-ROM NOT FOUND). I figured something wasn't hooked up properly so I reseated all of the connections from the psu to the GD-Rom, as well as the SCSI cable going from the GD-Rom. Nothing worked? I reseated the Dimm board as well as cleaned the disc and laser lens. Error still persisted. I read online that this error is either the lid on the drive is not closed properly (which wasn't the case), the disc wasn't present, or the drive died. I was kind of mad now that I would have to spend another $75-$150 on a "new" Naomi GD-Rom drive.

Of course me being as I am and not giving up on anything until every repair option had been exhausted I did some research. I learned that the laser assembly from a Dreamcast could be swaped into the Naomi GD-Rom unit and it would usually work. So I threw both of them on the table and proceeded to take them apart. I removed the GD-Rom drive assembly from the Naomi unit, and repeated the process on the Dreamcast. I heard there are two different drives used in a Dreamcast, Mine was a Revision 1 so the drive was 100% the same as the Naomi Unit. The ribbon cable in the Naomi unit must be reused as the Dreamcast's ribbon is much to short. The power cables (2 small connectors) make the trip with the gd-rom assembly as they are the same on both systems. The hardest part was getting the ribbon cable from the Naomi into the Dreamcast's laser assembly. A trick that I figured out was to undo the screw holding the metal rail in place that the assembly glides on. You pull the rail out, slide the laser assembly off of it making it much easier to get that ribbon cable inserted into it. Once done I placed the assembly back on track (ensuring the small spring that was under the rail was put back in place), and reinstall the rail and screw.

I was figuring it had almost no chance of working as I do not consider myself an expert by any means. So I went back to my Naomi setup and hooked up the drive. Turned it on and sure enough, no Error 24. The system went right into checking memory, and started loading from the GD-Rom drive. In a minute or two I was seeing Lupin III The Typing on the screen again (figured I would use that game as I knew it worked). Just incase you were wondering, when the error would happen it would quickly say Naomi GD-Rom System and then go right to Error 24 without checking memory. So now, all I have to do is replace a $10-$30 Dreamcast, which is much more common then a Naomi GD-Rom unit. So if you ever have this problem, grab a Dreamcast and fix it yourself.

Naomi Arcade Mod Bios

Other then this problem, Which had just happened a couple days ago, I had another "problem" with Naomi. Some games that I own (such as: Virtua Fighter 4 Evolution Ver B, Guilty Gear XX # Reload, Melty Bloody Act Cadenza Rev A) needed to be run on Japanese Bios and some games (Such as the Initial D Games, since they are the English exports) Need to be run on USA bios. Also some games will change a bit depending on what Bios is installed (example Gunspike (Japan) becomes Cannon Spike (USA) and Moero! Justice Gakuen (Japan) becomes Project Justice (USA)). Plus most of the games that are compatible with the Dreamcast controller ports need Japanese bios. My solution I had in place was to buy a Japanese bios chip and swap them when needed. Only problem here is every time I pulled out one of these chips I bent the pins a little and had a feeling that after a while one of them would break or I would do damage to the Naomi 2 board in a botched attempt to remove the bios chip.

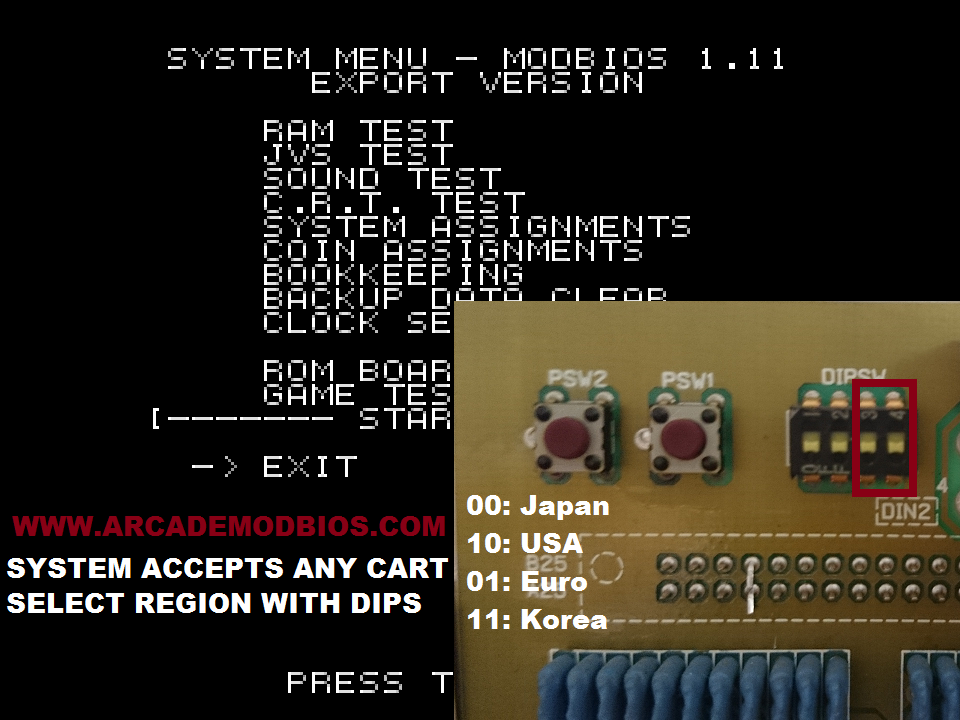
Enter ArcadeModBios. This is a bios chip for the Naomi or Naomi 2 which allows you to switch regions with a combination of dip switches 3 and 4 (which are unused otherwise). I had heard about this because someone on KLOV forums was selling a Naomi unit which hard these bios and briefly mentioned how it worked. I of course had no interest in getting his Naomi 1 unit but quickly found out that there was a version for Naomi 2 as well. The cost was about $30 for the chip shipped. Took a good month and a half to get here because unfortunately the first one he had sent got lost in the mail, but you know, those things happen. Finally got the bios chip on this past Saturday and all is well. I can easily switch from Japan Mode (3 and 4 off) to USA Mode (3 on 4 off) with just the flip of a switch without needing to completely disconnect the Naomi system or rip the bios chip out every time. So I highly recommend if you have a Naomi or Naomi 2 system at home and have games that require different bios, get yourself a Naomi Mod Bios chip.

Arcade Mod Bios dip switch settings (I received version 1.15)


Update: Many days later for the heck of it I plugged in the Dreamcast which now had the "bad" Naomi GD-Rom drive installed in it and to my surprise it works without problem. I tried about 5 Dreamcast games and all load and play without problem. I also tried Bleemcast Tekken 3 disc and even that worked without a problem. I can honestly say I can not understand why it works, perhaps there is something wrong with the GD-Rom drive that makes it not work in Naomi but does not prevent it from working on a Dreamcast console. Go Figure.

Tuesday, March 24, 2015

Sega Model 2A CRX and Model 3 Step 1.0 Differences and Similarities

At this point I own both Sega Model 2A CRX with Virtua Fighter 2 and Sega Model 3 Step 1.0 with Virtua Fighter 3. Both of these games were the marquee game for their original hardware revision and it only got better after that. Later steps and revisions had faster processors and more horse power. Having these to pieces for a few weeks now I have noticed a few things that are quite similar and some things that are very different between the two. So here they are:

Similarities:
  • Made up of 3 Boards (Graphics, CPU, Rom)
  • Both use Martin Marietta/Lockheed Martin Real 3d Chips
  • Use the same 25 Pin input connector
  • Display video in medium resolution (24kHz)
  • One power connector matches (10 pin ground & +5v)
  • Board stacks in metal cases fan cooled
  • Use the same Video (5 pin) and Audio (4 pin) Connectors
  • Output unamplified audio (Amplifier or Amplified Speakers needed)
  • Socketed roms make for easily upgrades (VF2.1/VF3TB)
  • Earlier games do not use security boards (Later games like DOA do)
  • Neither game got an arcade perfect port (same goes with the first 4 games)
  • A Model 2 will work in a Model 3 Cabinet as long as you connect the 24 Pin to the proper pins


Differences:
  • Model 2 uses an Intel cpu (i960), Model 3 uses a PowerPC cpu (603e)
  • Model 2 uses another 10 pin (+5v & ground), Model 3 uses a 24 pin for more power (+3.3v, Ground & +5v)
  • Virtua Fighter 3 uses an additional button (pin 12 on model 2 harness)
  • Model 2's fan connects externally, Model 3's fans (2) are internal and connect to the filter board
  • Some Model 3 Boards (like mine) have a vga port right on the filter board
  • A Model 3 will not work in a Model 2 Cabinet without a different power supply (one with +3.3v)


Sega Model 2a Board (with cage and filter board


Sega Model 3 Step 1.0 Board


Friday, March 13, 2015

Sega Naomi and Naomi 2 Hardware Information

The original Naomi is the arcade version of Sega Dreamcast. It has twice the graphics and system memory compared to the console and 4 times the audio memory. The reason for such a jump in audio memory is because the system does not stream cd audio off of a disc like the dreamcast but rather it runs the audio off of the rom chips or dimm board. Speaking of which, the Naomi games come in two forms. Some games will come as a rom cartridge and some games will come on GD-Rom disc which require a dimm board and gd-rom drive.

A Naomi System with Cartridge (Virtua Tennis)


The Rom cartridges are large rectangular cartridges with the name of the game on the top and 3 connectors on the bottom where the cartridge connects to the board. The benefit of this format is there is almost no load time since the game does not have to be read from an optical disc like its console brother.

A Naomi Cartridge (Dead or Alive 2):


The GD-Rom games do not work the way you would think. On the Sega Dreamcast the game would be read and loaded off of the GD-Rom disc in real time, however on Naomi to save on load times, when the system is loaded the entire game is loaded onto the dimm board. Think of the dimm board like a Naomi cartridge that instead of having permanent rom chips it has fully rewritable ram. Once the game is loaded into this dimm board the gd-rom drive shuts down and just like the cartridge games, there is almost no load time once in game. Loading a game from gd-rom to dimm board can take about 3-5 minutes depending on the size of the game. In order for the game to be loaded you must insert the proper security key chip into the dimm board, if the wrong chip or no chip is inserted the system will display an error code and not load. Dimm boards have a battery pack which makes them able to keep the game saved in the dimm board for 72 hours with the arcade machine off. Unfortunately these days the battery packs are either rare or expensive and most operators opt to just let the game load every time. As long as the cabinet/system is not turned off even with a dead battery the game will continue to run.

A Naomi GD-Rom Game (Guilty Gear XX)


A Naomi GD-Rom Drive


As far as input goes, like the 246, The Naomi uses JVS I/O boards plugged into the usb like connector. There are a few boards this system can use depending on the game you are running. For standard games that use just a joystick and 1-6 buttons a Sega JVS to Jamma I/O will work just fine. Some people prefer the more expensive Capcom I/O board but for 2 player games that just use standard joysticks and buttons (no excessive analog controls), the Sega board is inexpensive and works just fine.

Sega JVS to Jamma I/O Board


The board will connect directly to the 6 and 8 pin plugs of a JVS power supply which when used at home will either need an adapter or to be modified in order to connect it to the wall outlet. When using the GD-Rom drive you will need a splitter which either connects to the 8 pin as a pass through or connects to the smaller connector. Your GD-Rom drive will connect to the dimm board with a normal SCSI cable. The video can be connected directly to the vga plug on the front and will output to any vga compatible monitor as long as dip switch number 1 is set to the up position. The audio is connected into standard red & white composite audio plugs like most jvs systems and of course is unamplified so an audio amp in an arcade cabinet or amplified speakers will be needed to hear the audio properly. Unlike other JVS systems the Naomi only has one VGA port and one set of audio jacks (most jvs systems have 2 of each for vs play).

Front of the Naomi (showing filter board)


JVS Power Supply with the 3 Mentioned Plugs


The Naomi 2 is an upgraded version of the original Naomi. It has dual processors and dual graphics chips. It has the same amount of system memory as Naomi but double the graphics Memory, having 32Mbyte for each GPU. Each graphics processing unit renders one half of the screen. The best part about this system is it is fully compatible with all original Naomi cartridge and GD-Rom games along with having its own graphically enhanced games. Of course it goes without saying that a Naomi 2 game will not work in an original Naomi system. All interface and connections are exactly the same as the original Naomi so upgrading from a Naomi to Naomi 2 is very easy. The original Naomi cartridge games are the white/cream color that matches the system where as the Naomi 2 cartridges are the grayish beige that matches that system. The GD-Roms will be noted as working only on Naomi 2 on such games like Initial D, Beach Spikers, Virtua Fighter 4 and Virtua Striker 3.

A Naomi 2 System with Dimm Board


A Naomi 2 Cartridge (Club Kart European Session)


Some games such as Initial D need more analog inputs then a standard I/O can provide. Infact the game will not even boot unless a Sega JVS Type 1 I/O is present, the system will just reset without that board. Since Initial D uses a few more analog controls (Steering wheel and pedals) then the normal I/O could handle that is why it is locked out in such a way. I will have more on Initial D on its own page.

Sega JVS Type 1 I/O Board (type 1)


The one of the last Naomi topics (for now) that I would like to discuss is region protection. For the most part, most Naomi and Naomi 2 games will work just fine regardless of the bios that your system has installed. However, certain games will only run on certain Bios. For instance, Initial D english versions require either USA or Export Bios and will not run on Japan bios. Games such as Virtua Fighter 4 Evolution (Ver B), Capcom VS SNK Millennium Fight 2000 Pro, Melty Blood Act Cadebza, Guilty Gear XX #Reload and Street Fighter Alpha 3 Upper will only run on Japan bios. Other then the region restrictions there are some games that will not only fully translate themselves but also change their name depending on the bios. Moero! Justice Gakuen (Japan Bios) will change to Project Justice on USA or Export Bios just like Gunspike (Japan Bios) will become Canon Spike using USA or Export Bios. The best part is that the bios chip is socketed so no soldering or desoldering is required to switch it out.

One last thing that often gets people confused is that some Naomi games are able to use Dreamcast controllers. Not too many games support them and you must have a Japanese Bios installed. The only game that I have come across that will work in USA bios with the controller is Mobile Suit Gundam Federation vs Zeon (and the DX Version). Capcom was a company who supported this feature a good deal, infact many of their cabinets have a controller port right on the control panel. Games such as Moero! Justice Gakuen, Marvel Vs Capcom 2, Street Fighter Alpha 3 Upper, Gun Spike and Power Stone all support this feature in Japan bios. Games such as The Typing of the Dead, Lupin III The Typing and La Keyboard can use a Dreamcast keyboard using this same port. The filter board (that board on the front with all the ports) has pin headers marked CN6 and CN7. The first five pins of each of these are for the controller adapter. The official adapter that would come off of a control panel will be a full JST (Japanese Solderless Terminal) connector going across all pins even the unused ones. You however can get a 5 pin JST nh connector and splice it to a dreamcast extension cable eliminating the need to hack up any Dreamcast controllers and giving you the ability to swap in a Keyboard if you plan to play those games. Some games such as Moero! Justice Gakuen even have the ability to share data from the Dreamcast (Japanese of Course) to the Arcade Version. In this game your custom character made in the console version can be used in the arcade version if you bring your controller and memory card.

Dreamcast controller ports in a Japanese arcade:

Wednesday, March 11, 2015

Namco System 11 and Namco System 12 Arcade Information

Namco System 11 is a standard jamma board which is Namco's arcade version of the Sony Playstation. The board includes a standard jamma edge connector as well as a 48 pin edge connector which is used for additional buttons in some games such as kicks (hence the common "kick harness") or even block in Soul Edge. The additional connector is also responsible for the second channel for stereo sound (since the jamma harness is mono). This board is capable of only Standard resolution 15kHz video through the jamma edge. Notable games on this board are Tekken, Tekken 2, and Soul Edge (prequel to Soul Calibur)

The board is made up of three different board interconnected together. The base board, also known as the main board, contains the main program and sound roms that make up the game. The larger of the two sub boards, also known as the cpu board, As the name would make you think, houses the cpu and all of the system ram. It sits on top of the main board. The final and smallest board, also known as the rom board, contains all of the game's graphics roms. Since all of the roms are surface mounted it makes changing a board from one game to another nearly impossible. This however was not a problem due to the much lower cost per board compared to other hardware of the time such as Sega's Model 2.

The Namco System 12 (in the same vein as Namco System 256) is an upgraded version of the System 11. It features more memory and faster processors. Unfortunately the exact changes are not known at this time. This board made it possible to have much better graphics and more fluid animations in games such as Tekken 3, Tekken Tag Tournament and Soul Calibur. This new board also added full jvs compatibility. It however is still compatible with jamma and the 48 pin "kick harness" but it also gave the operator the option to connect vga video at 24kHz (dual vga for dual displaying like a normal jvs spec), as well as the 6 pin jvs power supply plug and the usb looking connector for a jvs i/o. When a Jvs i/o board is connected the 48 pin harness is not required anymore for your extra buttons as they connect directly through the i/o. The other thing that is added are two pairs of composite (red and white) audio plugs which are not amplified so you will either need a set of amplified speakers or a sound amp board.

As far as connecting these boards at home goes, all you will need is a standard Min Dong, Suzo Happ or other screw terminal power supply and matching jamma harness. Of course a 48 pin connector will be needed for the extra buttons used in most of the games (Kicks in Tekken and block in Soul Edge). When using a System 12 board as mentioned above it can be plugged directly into a JVS setup, but without need for the 8 pin power connector that many jvs power supplies have. Another interesting thing is that Namco System 12 board are fully compatible with Namco's Cyberlead cabinet and will display special messages on the led display while the game is playing. A special note, if you are connecting either Tekken Tag or Tekken 3 with a Sega JVS to Jamma I/O, Button 3 is used for Tag in Tekken Tag, however when connecting Tekken 3, Skip button 3 and connect the Button 4 and 5 for the Kicks.

Namco System 11 Board (Tekken 2)


Namco System 12 Board (Tekken Tag)


Tekken Tag Tournament running in a Cyber Lead Cabinet

Friday, February 27, 2015

Namco System 246/256 Arcade Hardware Information

The Namco System 246 is a PS2 based arcade hardware. The original units (versions A and B) had a regular Playstation 2 Motherboard along with a Namco Daughter board. The first version, version A board came in two original variants, the Driving version with the large amp connector on the front for the driving games and a special gun version with the interface board for the shooting games integrated into the case. The third variant of this early a board had the i/o board removed for some more standard inputs and outputs along with a 6 pin jvs power connection. Later variants (version b and beyond) of this system would have standard jvs connections on the front along with a ribbon cable port on the side for Namco's own custom i/o board. Strangely enough, the standard jamma or jvs power interface on the front was removed in favor of a custom 6 pin connection.

Now when it came to hooking up any board version b or later you had a few options. These boards came standard with a Namco JAMMA interface board. This board connected to the aforementioned ribbon cable interface on the side of the board and it had a place to connect a cable to the 6 pin power interface on the front. Alternatively you can connect a JVS to 246/256 adapter to the 6 pin and connect a JVS I/O board to the usb like plug by the dip switches. One warning I have for anyone trying to get this hardware working, do not use one of those small min dong or happ 16 or 15 amp power supplies with the screw terminals because it will simply not be enough power to run this whole system as it is a bit of a power hog and needs alot more then one of those supplys can provide. I learned this by trying to power one of these beasts with one of those power supplys for quite a few months only to have the video cut out after about 30 minutes or so. Of course this being my first arcade hardware I had no way of knowing there were other power supplys such as jvs and the larger ones like Gauntlet Legends would use.

The video can be connected a couple ways as well. There are dual vga plugs on the front of the unit, if you are using a standard jamma cabinet, you can connect the included small vga cable fron the vga port on the front to your Namco or JVS I/O board for standard jamma/JVS video. If you are like me and are connecting this unit to a pc monitor you can alternatively connect the vga port directly to a pc monitor as long as dip switch 3 is set to the on position which sets the game into 31 kHz mode or 640X480 pc vga resolution. This is also called High Resolution when it comes to arcade games. A few games such as Bloody Roar 3 do not support this video mode and will only display in 15 kHz Standard resolution mode, in which case a video converter like a GBS8200 or GBS8220 will be needed to make a pc monitor be able to handle the signal.

Now when it comes to controls there are also a couple options. The nice part, is when using the earlier (pre version c) hardware, you can just connect a Playstation controller to the port under the program dongle slot and play the game with it. Games such as Soul Calibur II and Soul Calibur III Arcade Edition support this. However, if you are either using a later revision or a game that does not support this (most do not), you will need to wire up either JAMMA or JVS controls. I personally use my Sega Jamma to JVS I/O which I had received with my Sega Naomi system as it is very easy to wire up and uses the standard Jamma interface only requiring changing the connections to fix the button configuration for your chosen game. The Namco I/O requires a kick harness for some of the extra buttons, so it is a bit more of a hassle to wire up.

A Game for the Namco System 246 comes with a DVD or CD disc along with a memory card looking Program dongle. The dongle contains the game's full program along with a any needed security key to unlock game content on the disc. The disc as you would imagine contains the full game assets including character models, textures, stages, music and more. The way the system functions is the first check is to the dongle, it checks security and program code and if all is well it will indicate this with a beep code. The system then spins up the disc and runs the game. Some games such as Soul Calibur II use a memory card to save character data instead of having it in the onboard chip. This is very good for such games as valuable location data is not lost when games are switched. Unfortunately not all games support this and high scores still save to the system.

Namco System 256 is an Upgraded version of the 246. It basically is an upgraded PS2 Spec in the same vein as Naomi 2 is a very upgraded Dreamcast spec. Like the 246 Version C board, the 256 board looses it's controller ports in favor of an on board interface which can be used to play its flagship game Tekken 5 with a ps2 controller. This game is also the first on the system family to support players saving their play data onto data cards similar to what Virtua Fighter 4 and Initial D use. The System 256 can also run most if not all System 246 games by changing a Jumper on the board from 256 to 246+ mode. Some people claim that the graphics to 246 games get enhanced when running them in such a way but I have not seen a difference. There was also an "enhanced" version called Namco Super System 256 but from what I have seen the only difference is that the gun I/O board is integrated into the system. The only game to use this system is Time Crisis 4 which can be run on a Standard 256 with the proper Gun I/O board attached.

The only other thing that the Namco System 256 and 246 Version C add is the ability to run certain games that use a hard drive such as Fate Unlimited codes on 246 and Gundam Vs Gundam Next on 256. Namco System 246 a and b board will not run hard drive games at all. In this case you remove the dvd-rom drive and replace it with the hard drive. The system functions in the exact same way but the game content is read off of a hard drive instead or the normal CD or DVD disc. This of course is good for games that contain too much data for an optical disc as the largest games only use a single layer dvd.

At the time of this writing neither Namco System 246 or Namco System 256 are emulated since a good deal of the interface and how the games are run is not fully understood on a technical level. Perhaps in the future emulation of these systems will happen but for now the only way to play these games is on the original hardware.

Namco 246 Version B


Namco System 256


Namco I/O board


246/256 To JVS Power Adapter

Friday, February 20, 2015

Atari Vegas 777 Arcade Board Set Information

Wow, 2 posts in one day, going for a record here.

Over the last couple weeks I learned quite a bit about the Atari Vegas arcade boards (info here will become part of the website) and figured it wouldn't hurt to get some of this information out there (all of which will be included on the website eventually). First of all the Atari Vegas arcade board is a combination of 3 parts. The Sound I/O board, The System Board and the Video Card.

The Sound I/O board is the first board in the series which has the Jamma edge connector and connector for the hard drive's power on it. This board (as far as I know right now) is pretty much interchangable when it comes to the different games. It also contains the dip switches for making adjustments to game settings (known as hardware dips) as well as the sound rom and Security chip (both socketed and changable). From the boards I have seen this board had several revisions ranging from 1 to 6. It would appear that some games need a dip switch changed based on which version of SIO board it is using. The ones I have seen personally are the original 1.0 version and the 3.0. Both of which look basically identical. This board also has interfaces for additional controls such as guns, players 3 & 4 as well as the interface for the additional hardware needed for the 49 way joysticks. The Hard drive connects to this board with a 4 pin molex to 4 pin molex cord for power. This same cord may also connect to several cooling fans depending on your setup. This board also has a connection for unamplified stereo audio if you do not plan to use pins 11 & M for the second speaker and the on board amplifier.

The System Board which connects to the video card and sound i/o board with dual pci connectors on either side, is basically the guts of this system. It houses the main processors and several other important chips. This board comes in 2 different flavors. They are named Vegas (the original) and Durango (upgraded version). Both board are capable of running Gauntlet Dark Legacy, NFL Blitz Gold, NBA Showtime and Sports Station (both sports games on one board). The Vegas Board can additionally run Gauntlet Legends and Unreleased fighting game Tenth Degree. The Durango board breaks compatibility for those last two games but can run the newer game War Final Assault. The easiest way to determine which system board you have is to simply look at them. The Durango board has an extra metal heat sync on the video card side and (atleast the one I have) has a Sticker by the video card pci slot saying RM5271/8 which indicates the cpu. Under or near that sticker the word Durango is also printed on the board. The Vegas board lacks the sticker and extra heat sync and a few of the components are in different places. This board houses the Boot or Main program rom as well as revision rom slot which can be used to upgrade games. The hard drive connects to this board with a standard IDE interface (usually a pretty short cable). This can also be swaped for a compact flash to ide adapter for better reliability (no moving parts). The boot and revision roms can be removed and replaced for different games as well.

The Video Card is a standard pci video card which can actually be used in an older computer. Gauntlet Legends, Gauntlet Dark Legacy, Tenth Degree and War used an Obsidian Voodoo 2 3dfx card with 10mb of video ram while the sports games used an Obsidian Raven video card. No games will boot at all if the proper video card is not present. If your Voodoo 2 based games need a replacement card any Voodoo 2 card with atleast 10mb of ram can be used. I have tested this myself and have successfully ran an Diamond Monster 3d Voodoo 2 12mb with no noticable change. As fas as I know, weather a game can display in 640X480 VGA (Arcade High Resolution), is software dependent not hardware dependent. I have tested Gauntlet Dark Legacy which displays in VGA straight from the video card on both the Durango and Vegas System board. However Gauntlet Legends could only display in Standard 15hz or Medium 24hz video which a PC monitor would not be able to handle without a video converter such as the GBS8200. When you are displaying video through the jamma harness a short vga extension cable is used to go from the video card to the system board. From what I heard your harness must supply -5v to the board in order for video to be properly displayed this way.

Video Card Comparison


Vegas 777 Board Set with Voodoo 2 Card and Vegas System Board


Vegas 777 Board Set with Obsidian Raven and Durango System Board

Proposed large Website update

Along with my planned Arcade section of the website I plan to make a few other improvements. Of course this is all still in the planning stages so nothing is final yet. The biggest thing I plan to do is place the main sections on the top of the link bar (Dead or Alive and Arcade) and everything else below that. I figure this way I can make it easier to get to my largest website sections instead of having to scroll through all of the one or two page console sections. Mind you I will still have that content on there but just lower on the link bar. Of course I still plan on linking everything to the proper sections, such as making a link to the doa1 costume page on both the Sega Saturn and Playstation sections since both of those systems are covered there but that will probably come later.

Another page of the website I hope to expand is the PC section which currently is like a small paragraph and a stock photo. I plan to atleast include the specs of the computers I own and maybe even more then that.

Going back to the arcade section, I plan to have a page for each "system" such as Namco System 11/12, Namco System 246/256, Sega Naomi 1/2 and so on. Basically combining the systems that are just upgrades of each other onto the same page as they share alot of the same properties and work in a very similar way. I will also be having a full software listing for each board with pictures (which of course will take some time, it will go up a little at a time instead of in one burst).

The other thing I hope to do some day is have a full game listing on my website with links to all console sections as well as a central hub where all of the collections are linked. Similar to what Yakumo has on Segagagadomain.com. Of course that will be something I might work on this year after the arcade section is finished.

Tuesday, February 3, 2015

Website Arcade Section Idea.

I am thinking of making an arcade section on my website detailing the hardware that I own. There idea here would not only be to show off what I have but to also share the knowledge that I have acquired in the process of getting it working. Unlike console games getting each piece of arcade hardware working (in a home setting) is not always straight forward and I feel that this section of the website could really serve as resource for people who are in the same boat I used to be in. Basically something to help people who want to try out the idea of getting arcade games working at home but might not want the headache of having to figure everything out on their own.

Currently I have the following hardware: KLOV Vaps Profile Here (New pickups spoiler warning, full list will be on the site soon too)

Sega Naomi 2 w/GD-Rom (Too many carts and discs to list)
Namco System 246 (b) (Tekken 4, Soul Calibur 2 and 3 Arcade Edition)
Namco System 256 with Tekken 5 and 5.1
Sega Model 2 w/ Virtua Fighter 2
Namco System 12 (2 Boards, Tekken 3 & Tag)
Namco System 11 (3 Boards Soul Edge, Tekken 1 & 2)
Tecmo TPS ZN Dead or Alive ++
Capcom ZN-1 Heaven's Gate
SNK Neo Geo King of Fighters 2003 Japanese Jamma Board
(More to come soon)

Getting some of these working were pretty easy since they were just jamma boards but others took quite a bit more. One of the systems (since it was my first) that was hard to get working was Namco System 246. The biggest mistake I had made was using an pc power supply spliced into the jamma harness. Not only was this connection not reliable, the psu didn't provide the amps needed for the quite power hungry system so it would turn off after only having been run for a few minutes to an hour. The solution to this problem came much later. By using an adapter connected to the jvs power supply I had received with my Naomi setup, I was finally able to get 246 running reliably. This of course worked perfectly with my 256 I eventually acquired. Its these month after month headaches I hope to spare people who want to do this kind of crazy arcade stuff.

In the coming weeks and months I will be working out how this will be setup. I am thinking of putting my main sections (dead or alive and arcade) on the top of the links bar and putting all of those console sections under them, thus making my main and more important sections easier to navigate to. I am sure I will figure something out soon enough. Keep an eye on the website for coming changes.

Friday, January 30, 2015

Forgot I even had this blog

Hello world, or atleast the one or two people who might see this message. I can honestly say I did not remember that I had this blog. Perhaps I might add an entry every once in a while. It will probably work hand in hand with my youtube channel. We shall see I guess.